Friday, December 30, 2011

My SSCS gift

I thought this was going to be my last post for this year ..... but I was asked how the scalloped border was added and since it is still fresh in my mind, this is the right time to post about it. The pink scalloped section was appliqued onto the teal blue border. After the pattern was copied from the magazine and pasted together (I think the pattern was enlarged by me), the pattern was placed on the wrong side of the pink fabric and pinned in place really well. Then, a 1/4" seam allowance was cut away (see bottom right hand side) all around the pattern. Then the seam allowance was rolled to the back (fabric had to be clipped in places on the curves and dips to allow the fabric to be rolled back easily) and basted in place (using the English Paper Piecing method). Once the scalloped section was basted, it was placed on top of the teal blue border, making sure that there was enough of the teal blue fabric where the scalloped border dipped inwards. The scalloped section was then pinned really well in place and then appliqued. 

I didn't take photos of the remaining steps, so you will have to use your imagination for visualising the rest of the steps. 

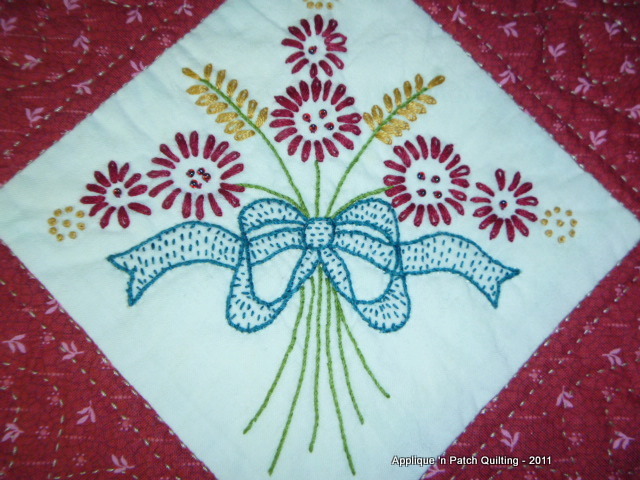
The white diamond square had the 1/4" seam allowances rolled back and basted and then pinned in place on top of the scalloped pink section and appliqued on as well. Excess fabric was cut away from behind the white square and then the embroidery design was traced onto the white fabric using my light table. 

Once the top was brought to the flimsy stage, it was placed on top of a piece of batting (it was basted a wee bit to hold all the layers together) and then the embroidery was done using an embroidery hoop. It was a bit bulky with the batting but I much prefer the look of batting with the embroidery. Once the embroidery was all done, then the backing fabric was added to the back and basted really well and then hand quilted. There ... now you know how it was done. 

When I'm working on something different, I often think that no-one will be interested to see how a project was done .... until they ask a question and then it hits me that there are people out there that are interested and that is when I regret not taking photos to show my process as I go along. 

To the person asking about my blog .... it is just a standard template from http://www.blogspot.com/ Once there, look for a tab to Create a Blog. It was quite easy to set-up and it is free. One suggestion for photos is to use Picasa (free downloadable program) to downsize your photos as you will quickly run out of free space offered by blogspot. 

Happy New Year to all!

Wednesday, December 28, 2011

SSCS from and to ...

Once again, we all have to thank Miss Chookyblue for doing another fabulous job in organizing this swap and once again, I have received another wonderful gift ...... from Ilene in Australia. What can I say, except .... I love my tree hanging! I will have to try and figure out how she did this. There is a lot of fabric folding going on here and it is intriguing to me. I will enjoy my calendar this coming year. Thank you, Ilene for my treasures!

At last, I can reveal my gifts that were sent to Tracy. This moose plaster ornament was hand painted by me. I have been doing these for years and still have a nice stash waiting to be painted.

This is the wall hanging that she received.

Below photo shows some hand quilting being done ......

Tracey, you were so lucky that my package got sent off in a timely manner. Miss Ashes did her best to impede my hand quilting work by constantly putting her back paw on my hand.

A close-up shot of the hand quilting with all the markings washed out (Crayola Washable markers).

Those buttons really added to the final look.

I do like how the embroidery turned out.

Where did the ideas come from? Well, for a start, the scrolled pink border came from this pattern ....

.... in this magazine.

The embroidery pattern .....

..... came from this magazine.

This will be my last post for this year. I do want to wish you and your family all the best in 2012.


Have a great day, eh!

Sunday, December 18, 2011

Design Wall

My sewing studio has been getting an overhaul lately. It is that time of year to sort through and clean up in preparation for the new year coming. It is a good feeling to get organized.

On my design wall are 3 projects that were started and abandoned and it is about time to get back to them. There is hand applique, hand piecing and patchwork .... they are all so different and will keep me from getting bored too quickly and hopefully not start a new project ..... uhmm not too soon! :o)

My pinwheel top (on the table) is having borders added. Now, this is one quilt that will not get me stopped as I know exactly what to do with the borders. My SIL Jeanne recently sent a photo of a memory wall hanging that she made for a friend. When this lady's husband died, she set aside all his jeans, flannel shirts, ties and hankies and gave them to Jeanne to make something with them.

Jeanne represented in the design their children, grandchildren and great-grandchildren, wedding date of the couple, their flower of the month, zodiac signs, the Elizabeth Mountain and snow flakes. Jeanne, you did a lovely job!


Have a great day!

Wednesday, December 14, 2011

Thank you, Santa

Santa has been good to me so far this year. You all know how much I love to recycle. What do you think of my find that I picked up off the curb last week? This wicker love seat was being picked up by the garbage truck later in the day, but I got to it first? In pretty bad shape, don't you think? Well, after wrestling this wicker love seat into the back seat of my car, I drove home to see if DH could do a miracle with the seat. The wicker seating was rotten through and falling apart in places. The frame was still good and strong ... just the seat part. So DH went out and bought a 1/2" sheet of plywood and cut out a new seat. Meanwhile, I disinfected the whole love seat with soap, bleach and water and left it to dry overnight. By soaking and left to dry, the wicker will only become stronger and I must remind myself to do that every year. Once I got my hands on that new seat, out from my stash came foam, batting and upholstery fabric. This is what the new seat looks like now. The only money spent was $8.00 for the wood. Not bad, eh! In the spring, I'll spray paint the love seat as the paint has peeled off in a few places. :o) Talk about being in the right place at the right time!This is what my new-to-me loveseat looks like in my wee nook in my sewing studio. Now, when We 3 Quilters (that is what our group is called .... Debra, no blog Mary and myself) meet, we will be comfy for sewing. All that is needed is one of the deck chairs to be brought inside and we are all set for our next meeting at my place The battered old trunk acts as a coffee table as well as holding all my finished tops and if one of the girls want to see such and such top, well they can just open the lid and dive in.
Last month, DH asked me what I wanted for Xmas and he was told about a pattern that I have been yearning for. Finally, today the pattern arrived from Australia. Oh, happy days are here again .... guess what I'll be working on in the new year?
Yep .... Santa has been very good to me so far!

For my SSCS partner .... my gift is still intact .... for now. :o)

Have a great day, eh!

Sunday, December 11, 2011

Borders ... ugh

My Pie in the Sky is assembled .... except for the borders. Now, usually this is where this project would get shelved .... but not this time. I am determined to get this to the flimsy stage. At first, I thought this was going to be a piece of cake. The outer border was definitely to be included and the inner border was auditioned. As in .... many times and finally decided on the darker blue. When my DH saw the mock up (#1), he questioned about the lack of contrast between the two borders. So more fabric was pulled for auditioning. Continuing with blues (#2 and #3) ....
.... and then 2 shades of green (#4 and #5) ....
.... with lots of stripes (#6, #7 and #8) in various widths and colours. Since my inner border is striped, my concern was can the outer border be striped as well? You know, I do love to break rules! :o)
Then a plain gold (#9) which really popped but does it give the eye a place to rest?
A neutral shade (#10) ...
Darn .... I think I'm stalling after all! Which one would you go with? Help!!!! 

Have a great day!

Friday, December 9, 2011

French Knotted out

At last, I can show you some secret stuff that has been happening in my studio. Debra and no blog Mary turned 50 this year and they needed to have a special gift. So, to work I went and created this for Debra ... ... and this for Mary. We're talking a gazillion of French Knots in these two pieces of wall art.


Here is Mary opening her gift last night. Debra received her gift last month and she posted about it here. Needless to say, both ladies were very happy with their gifts.


We've been getting together on Thursday nights for the last couple of months and usually we do some sewing. Talk about a great motivator our meetings are for us. But last night, after munching on delicious Red Velvet cake (it was a small cake just in case any of you thought we were a herd of ....)


.... all we did was browse through some magazines and chit chatted. I had been doing some shopping lately and had a lot of stuff for 'show and tell' time. Debra showed us a scarf that she is knitting and Mary showed us her problem for making a pair of PJ's for a friend. A few more blocks got pinned together for my Pie in the Sky. It was a lazy evening. Oh well .... next week we will all try to be more productive.


The pinwheel blocks you see on the design wall ..... well that is a story for another day.


It was a great evening and fun was had by all.


Have a great day!

Monday, December 5, 2011

Xmas ornament

My Chookyblue's Secret Santa is being really secretive this time. I have no idea who sent this lovely ornament to me from Australia .... but I will find out eventually. For now, it is hanging from my caribou ornament on the fireplace mantle. The main gift in the package is just itching to be opened. I even tried to peek inside ... but she double wrapped my gift. Double darn. I don't think it will last until Christmas Day. :o) In fact, I know it won't stay unopened. My fingers are getting itchy..... very itchy.... Right now, I don't have too much that can be shown .... that will change come this Thursday when Debra and Mary meet up at my place for our weekly sewing evening. What fun we do have and we actually can get some stuff accomplished. There are a few more Xmas decorations to get up before they come over, so you all know what I will be busy doing. :o)

Have a great day!