This post is for my friend, no-blog Mary who has asked for help from afar. Thanks heavens for the internet and blogs.
No-blog Mary has started doing applique and wanted some instructions on how to get nice pointy leaves.
So ... here goes ...
If you do your applique using freezer paper, needle turn or paper piecing, you will have a tail at the pointy end of your leaf. The tail could be on the left or right side.
With a pair of scissors, stylus or needle, push (flip) that tail inside
so that you don't see it anymore. See the tip now with no tail sticking out. It looks nice and pointy.
If there is too much bulk at the point, then you can trim the tail .... but not TOO much. Leave at least 1/8" of fabric, otherwise the fabric will start to shred and you won't have anything solid to anchor your stitches at the point.
After trimming, flip the tail back inside and using small stitches, sew to the point and then continue sewing around until you have your entire leaf sewn.
This is what it the leaf will look like once all the basting stitches and backing has been cut away
To trim or not trim? I get that question a lot. In the beginning of my applique journey, I didn't trim away any fabric on the back of my applique. Nowadays, I trim or cut away the backing fabric. Why? Since I hand quilt a lot of my quilts, there were just too many layers to quilt through and that is why my applique gets trimmed afterwards. Below, you can see the difference with one side trimmed and not the other.
Mind you, there will always be an exception to the rule. In particular, a lady that I know is doing an applique project that has a dress form on each block. The dress will be stuffed and embellished. The extra fabric on the back will be left to add extra stability to the dress, otherwise it might have a tendency to sag or become wavy once the quilt is finished.
Are you curious to see what project that leaf will be used for? A wall hanging of leaves, vines and circles. I've been seeing this on Pinterest a lot lately and made up my own pattern using EQ7. Yep, another new project! :o)
Well, no-blog Mary, I hope this helps you!
Have a great day!
Sunday, May 24, 2015
Thursday, May 21, 2015
No idle hands here
I have been on a mission to get a summer project ready for traveling to the cottage. Out came my paper templates and pre-cut fabric pieces for my Scrappy Garden.
When you last saw it, back in February of this year, it was like this:
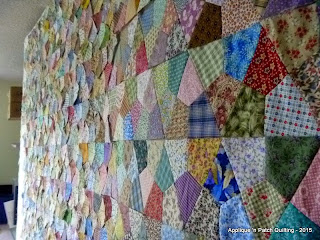
After putting in a concentrated effort, my project got to this point where all the triangles were sewn into rows. The rows are not yet joined together. That part will come later.
It has taken me almost a week to get this section (that you see on the left) paper pieced. All those pieces are just pinned onto the design wall.
Can you see the difference between the area on the right where all the triangles have been sewn together and the section on the left where the pieces are just pinned onto the design wall. A lot of pins, eh!
Next step is to take three pieces and sew them together to form a triangle.
Have a great day!
When you last saw it, back in February of this year, it was like this:
After putting in a concentrated effort, my project got to this point where all the triangles were sewn into rows. The rows are not yet joined together. That part will come later.
It has taken me almost a week to get this section (that you see on the left) paper pieced. All those pieces are just pinned onto the design wall.
Can you see the difference between the area on the right where all the triangles have been sewn together and the section on the left where the pieces are just pinned onto the design wall. A lot of pins, eh!
Next step is to take three pieces and sew them together to form a triangle.
One triangle down ..... a zillion more to go. :o)
Yep, it will take me all summer to do that section .... but that is OK with me. I enjoy this process.Have a great day!
Sunday, May 17, 2015
Neighbourhood Show & Tell Tea
Last Saturday, May 9, 2015 the two guilds (Near North Quilters' Guild and Northern Lights Quilters' Guild) that I belong to here in North Bay hosted a Neighbourhood Show & Tell Tea. We invited guilds from as far away as a 4 hr. drive. They came! They actually came.
The theme was chickens. Chicken pincushions on the tables. Each person attending got to take home a small chicken pincushion and one person at each table won the big chicken pincushion.
Chicken blocks. The idea was to make a chicken block and bring it to the tea and have a chance to win more blocks to make a quilt.
Enough blocks were submitted to give away three sets of twenty-five blocks. Three lucky winners went home quite happy.
The chicken block pattern came from Quiltmaker's 100 Blocks, Vol. 4, (A Bird in the Hand, block #333) and it was designed by Cheryl Brown (quilterchic.com).
We had quilts on display. These quilts were the result of workshops, BOM and Mystery Quilts presented by both guilds.
But .... what everyone came for was the show & tell. Each guest who came had to bring something for show & tell. It was amazing! The photos below are just a wee taste of what we saw.
Some guests presented their quilts/items in groups of three:
Most were by themselves.
We not only had quilts, but stitchery pieces as well. We had large quilts and small quilts. There was interest to see who had the smallest quilt/item to show.
Our emcee's for the day were the presidents of both guilds. Lois and Terry, you did a great job! They did chicken jokes (of course) and to win the large pincushion .... well .... we even had the chicken dance. Guests even chimed in with their chicken jokes.
The idea for the Neighbourhood Show and Tell Tea originated with Rayside-Balfour near Sudbury, Ontario. It has been presented for about 10 years and each year a different guild in a different city will host the tea.
This was the first time we hosted this show & tell tea in North Bay. Approximately 200 guests came. A light luncheon was served at noon. We also had a mini merchant's mall for our out-of-town guests to browse through and purchase some goodies. It was an amazing day! Thank you to all that came to our show and tell.
Have a great day!
Sunday, May 3, 2015
Heap of Scraps
Back in March, I talked about buying a box of scraps for $10.00.
So far, I got this top almost made. The only fabric pulled from my stash was the background fabric where you see the applique. The borders will also come from my stash. Oh dear, I really, really must get back to this project.
Then, after pulling all of the green, red and neutral fabrics, I figured there was enough to make another top. The trees that you see, will go all around the quilt.
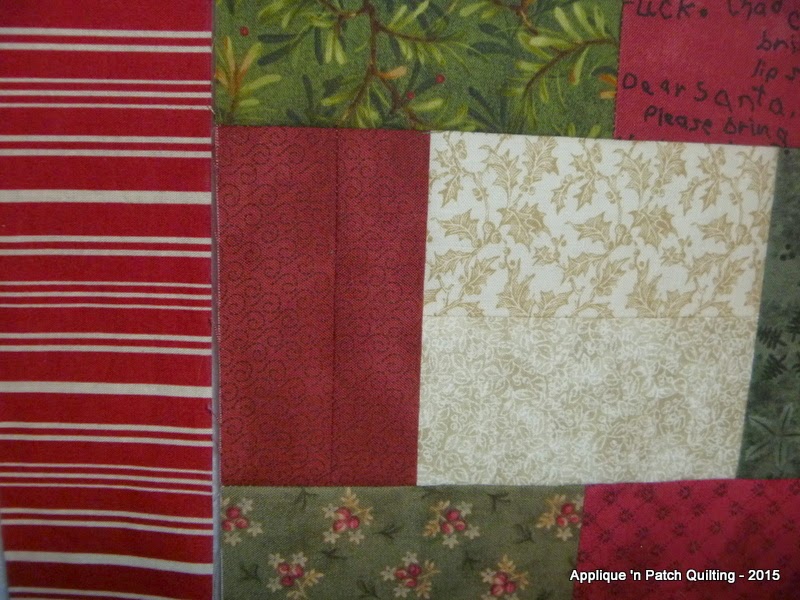
The red striped fabric is from my stash. Everything else ... so far ... is from the box of scraps.
Being creative is good for the soul! I'm calling this top "Humble Christmas".
Initially, my plan was just to make the one top and then pass on the scraps. But, darn it, curiosity got the better of me and now I'm trying to see how many tops can be made from those scraps. Perhaps some hexies will be forth coming?
Have a great day!
So far, I got this top almost made. The only fabric pulled from my stash was the background fabric where you see the applique. The borders will also come from my stash. Oh dear, I really, really must get back to this project.
Then, after pulling all of the green, red and neutral fabrics, I figured there was enough to make another top. The trees that you see, will go all around the quilt.
Now, with this top there are a lot of humble blocks. In the box, there are not too many large pieces, some 2-1/2" wide strips. Most are 2" or 1-1/2" strips. So, in order to get 2-1/2" pieces for my blocks, I had to resort to sewing smaller strips of the same fabric together and then trim down to 2-1/2" wide. Here are just a few blocks where you can see what I've done.
Being creative is good for the soul! I'm calling this top "Humble Christmas".
Initially, my plan was just to make the one top and then pass on the scraps. But, darn it, curiosity got the better of me and now I'm trying to see how many tops can be made from those scraps. Perhaps some hexies will be forth coming?
Have a great day!
Subscribe to:
Posts (Atom)


